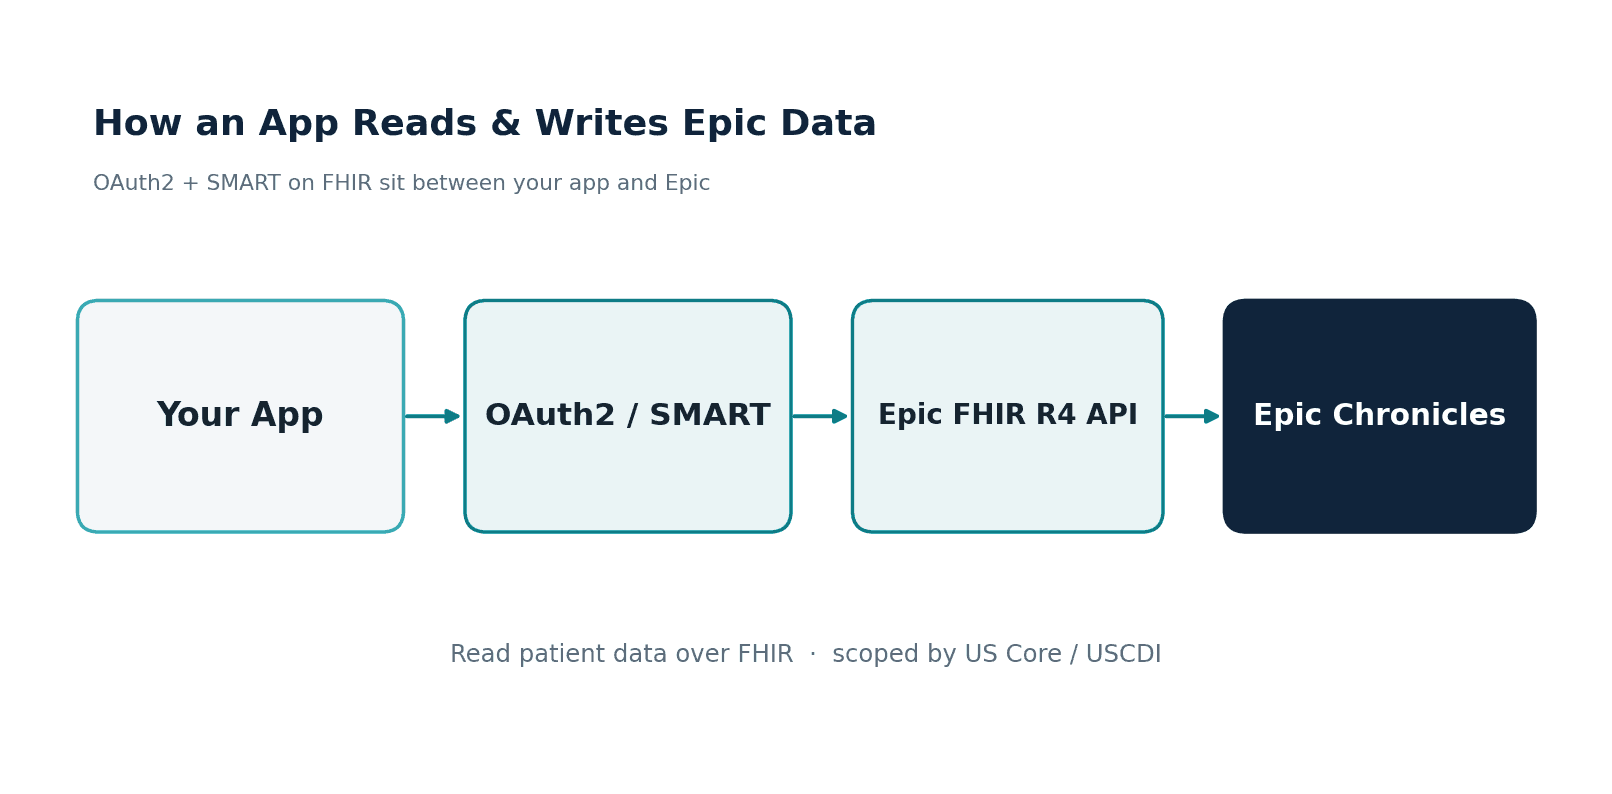
There is no good visual guide to SMART on FHIR. That is not an exaggeration. Search for "SMART on FHIR architecture diagram" right now. The top result is a blurry 2016 image from ResearchGate. The HL7 SMART App Launch specification itself contains no architecture diagram. The official FHIR documentation describes the OAuth2 flow in dense prose paragraphs with no visual representation of the launch sequence. And yet, every healthcare developer building a FHIR-integrated application needs to understand this protocol deeply, because At its core, SMART on FHIR is how your app gets authorized access to patient data in every major EHR system.
This architecture is not theoretical — see our SMART on FHIR nursing app case study where it saved 1.5 hours per patient.
This is the guide that should exist. We will walk through the complete SMART on FHIR architecture with clear, numbered flows for both EHR Launch and Standalone Launch. We will cover the OAuth2 + PKCE authorization sequence step by step, decode the scope syntax that confuses every developer the first time they see it, show you working JavaScript code with fhirclient.js, and map the vendor-specific differences between Epic, Oracle Health, and athenahealth that will bite you in production if you are not prepared.
If you are building a clinical application that needs to read or write FHIR data from an EHR, this is your reference.
What SMART on FHIR Actually Is
The name SMART on FHIR stands for Substitutable Medical Applications, Reusable Technologies on FHIR. It was created by the Boston Children's Hospital Computational Health Informatics Program (CHIP) and Harvard Medical School. The specification is maintained by HL7 International as the SMART App Launch Implementation Guide, currently at version 2.2.0 (STU 2.2).
Developers new to healthcare often describe SMART on FHIR as "OAuth2 for EHRs." That description is technically incomplete and practically misleading. SMART on FHIR is OAuth2, yes, but it layers four critical healthcare-specific concepts on top of standard OAuth2 that you will not find in any generic OAuth2 tutorial:
- Launch context: When a clinician launches your app from within an EHR, the EHR passes a
launchparameter that encodes the current context -- which patient chart is open, which encounter is active, who the logged-in practitioner is. Your app does not ask the user "which patient?" -- the EHR tells you. This is fundamentally different from a consumer OAuth2 flow where the user's identity is the only context.
- FHIR scopes: Instead of generic scopes like
readorwrite, SMART on FHIR uses scopes that map directly to FHIR resource types:patient/Observation.read,user/MedicationRequest.write,launch/patient. The scope syntax encodes who is accessing, what resource type, and what operation.
- FHIR-native discovery: Your app discovers the authorization endpoints by querying the FHIR server's
/.well-known/smart-configurationendpoint. No hardcoded URLs. No per-vendor configuration files. One standard discovery mechanism across every compliant EHR.
- Patient-bound tokens: The access token you receive is bound to a specific patient context. That token response includes a
patientfield containing the FHIR Patient resource ID. Your app's FHIR API calls are automatically scoped to that patient -- you cannot access other patients' data even if you construct the right URL.
The result is a protocol that solves the specific problem healthcare apps face: how does a third-party application securely access a specific patient's clinical data from an EHR, with the right permissions, in the right clinical context? Standard OAuth2 does not answer that question. SMART on FHIR does.
For a broader view of how SMART on FHIR fits within the healthcare security landscape -- including HIPAA requirements, token handling, and audit logging -- see our healthcare API security guide.
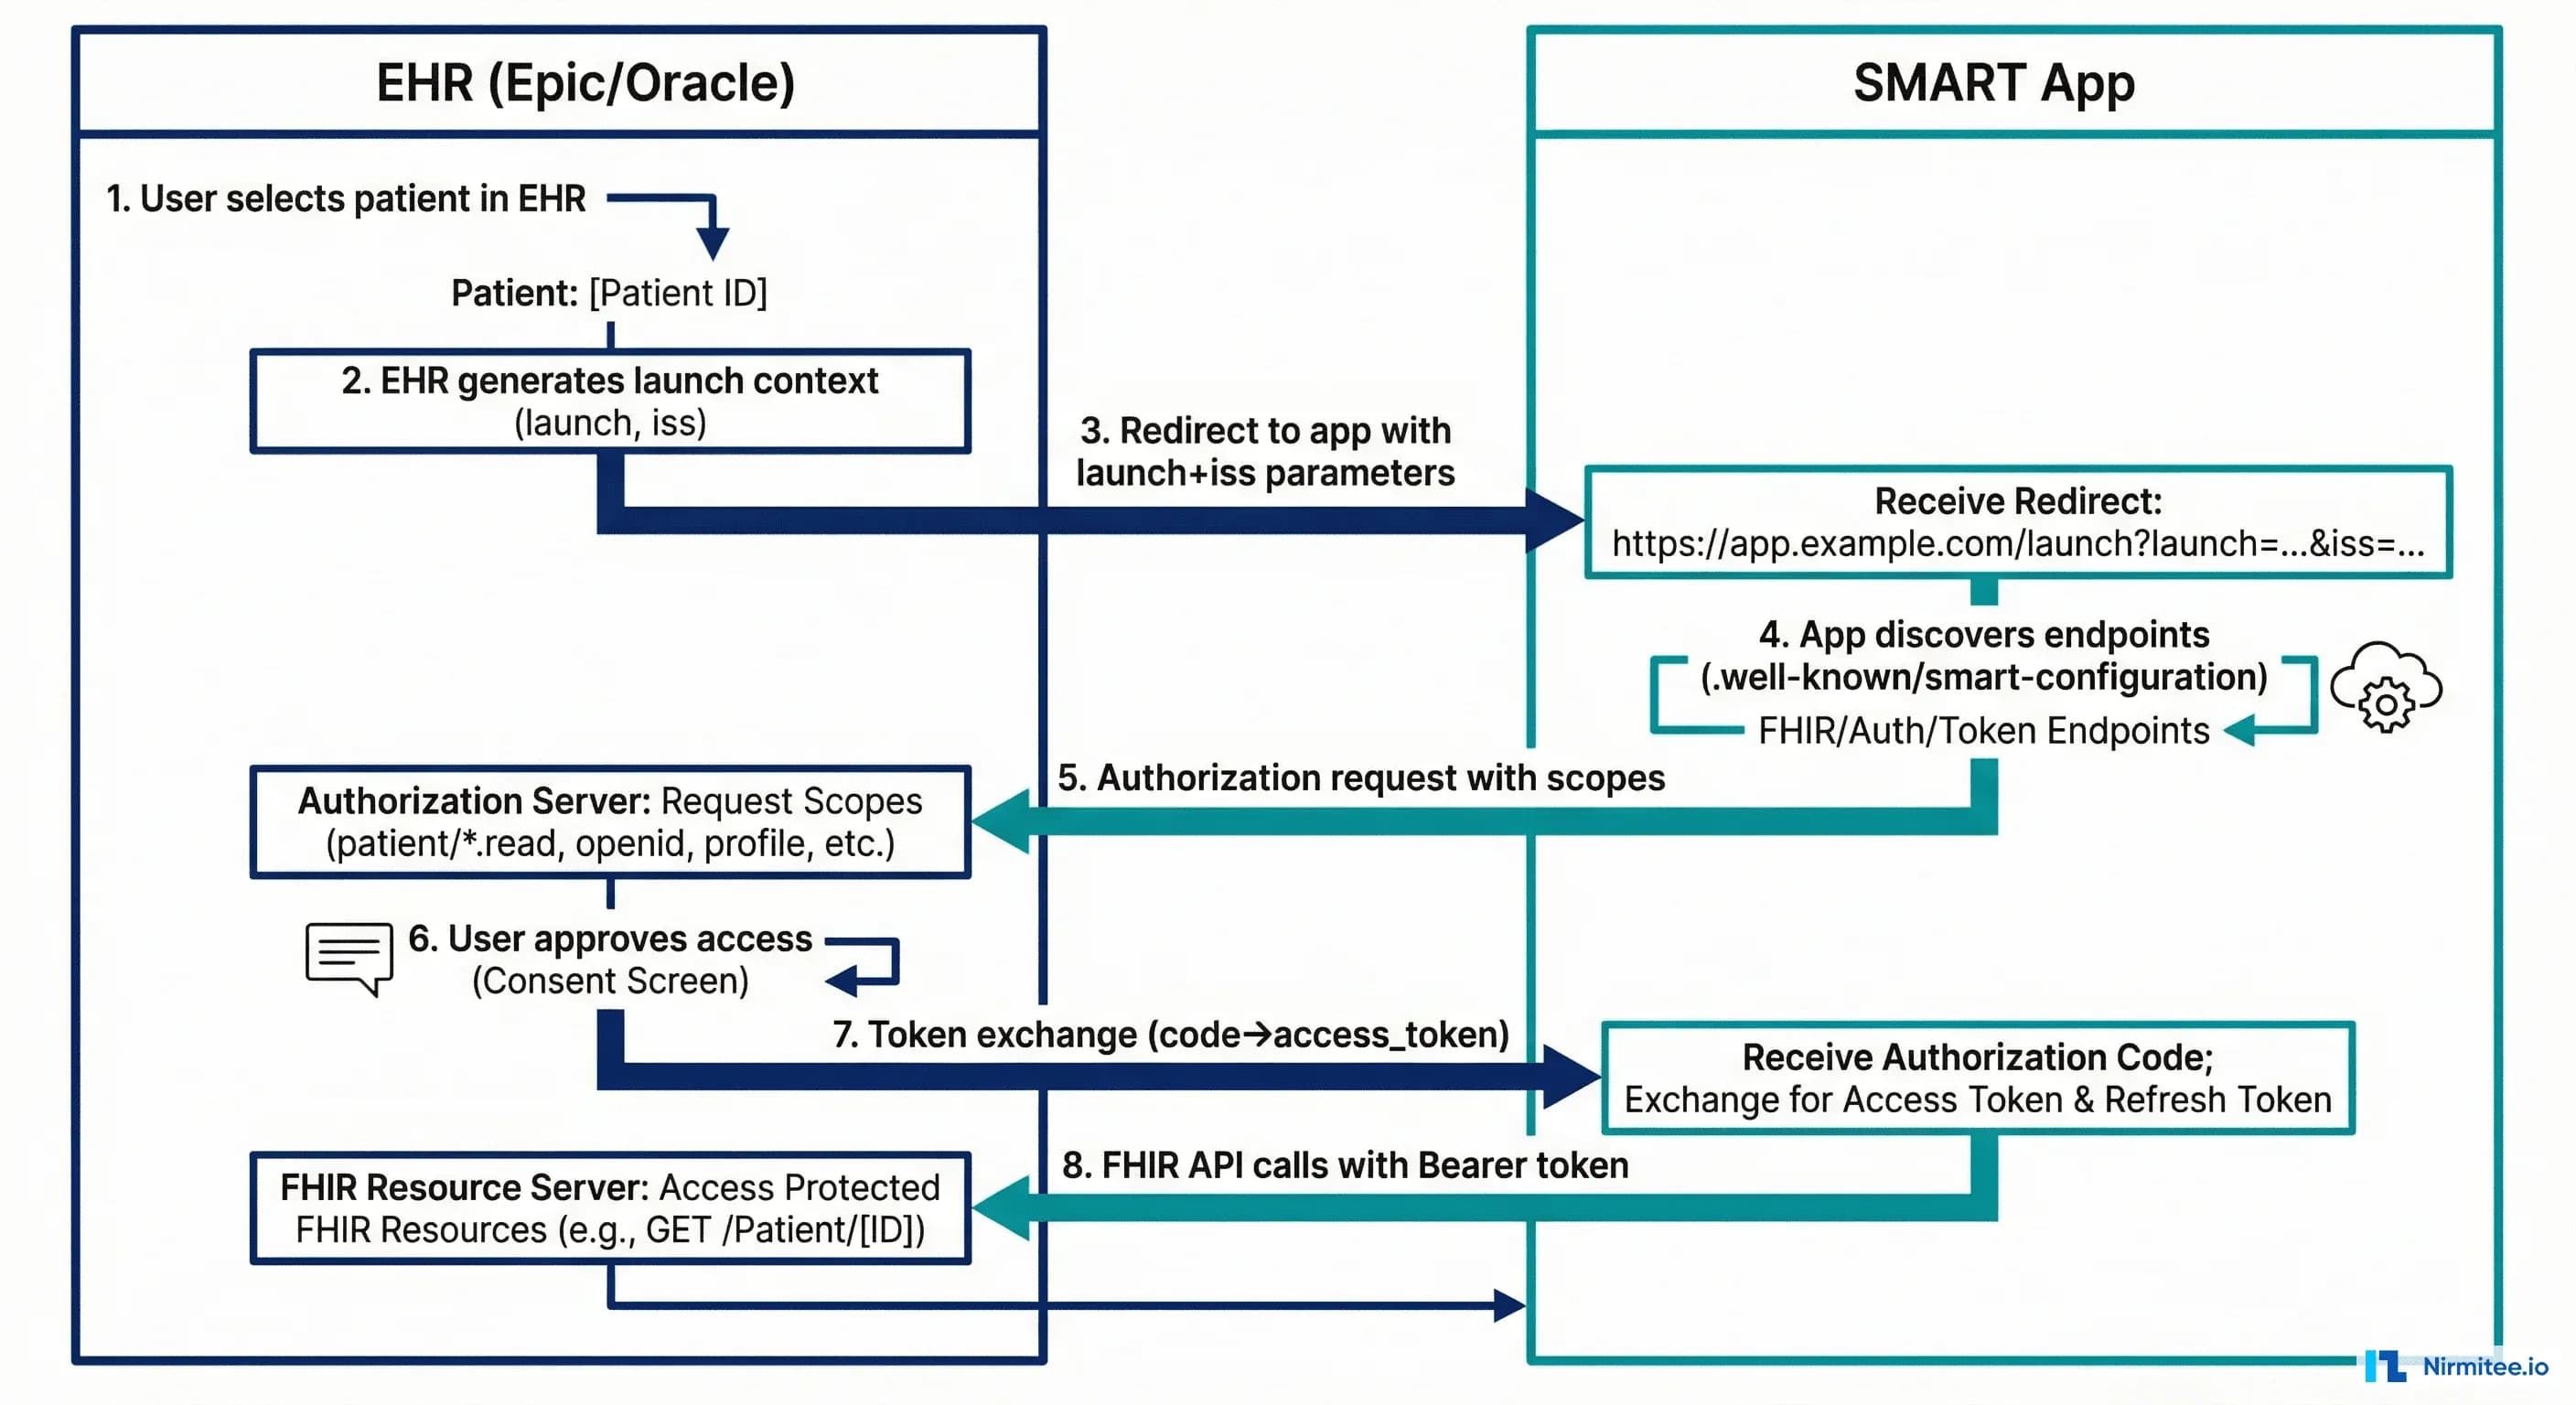
EHR Launch vs Standalone Launch
SMART on FHIR defines two distinct launch sequences. Understanding the difference is essential because they serve completely different use cases and your app needs to implement the correct flow -- or both -- depending on how clinicians will access it.
EHR Launch
In an EHR Launch, the clinician is already working inside the EHR. They click a link or button within the EHR's interface to launch your app. The EHR passes a launch parameter that encodes the current context -- which patient chart is open, which encounter is active, who the logged-in practitioner is.
It is the flow used by apps embedded in the clinical workflow: clinical decision support tools, specialist referral apps, imaging viewers, and documentation assistants. The clinician never leaves the EHR; your app opens in a frame or new tab with all the context it needs.
The EHR Launch sequence works as follows:
- Clinician clicks your app's launch button inside the EHR. The EHR redirects to your app's registered launch URL with two query parameters:
iss(the FHIR server base URL) andlaunch(an opaque token encoding the current context).
- Your app discovers authorization endpoints. Using the
issvalue, your app fetches{iss}/.well-known/smart-configurationto find theauthorization_endpointandtoken_endpoint.
- Your app redirects the browser to the authorization endpoint. The redirect includes the
launchparameter from step 1, yourclient_id, requested scopes (includinglaunch), a PKCEcode_challenge, and yourredirect_uri.
- The EHR's authorization server validates the request. Because the clinician is already authenticated in the EHR, there is often no login prompt. The authorization server may show a consent screen if the requested scopes require explicit approval.
- The authorization server redirects back to your app with an authorization
code. - Your app exchanges the code for an access token. This is a server-to-server POST to the
token_endpointwith the authorization code and the PKCEcode_verifier.
- Inside the token response you get the launch context:
access_token,patient(FHIR Patient ID),encounter(if applicable),id_token(if OpenID Connect scopes were requested), and token metadata. - Your app uses the access token to call the FHIR API for the patient in context.
Standalone Launch
In a Standalone Launch, the user opens your app directly -- by navigating to your app's URL in a browser, opening a mobile app, or clicking a bookmark. There is no EHR context. Your app must discover the FHIR server, authenticate the user, and if needed, allow them to select a patient.
Patient-facing apps use this flow (patient portals, personal health records, wellness apps) and by clinician apps that operate outside the EHR (population health dashboards, bulk data analytics tools, administrative apps).
The Standalone Launch sequence:
- User opens your app. Your app already knows the FHIR server URL (configured during registration) or presents a picker if it supports multiple EHRs.
- Your app discovers authorization endpoints by fetching
{fhir-base}/.well-known/smart-configuration.
- Your app redirects the browser to the authorization endpoint. The request includes
client_id, requested scopes (includinglaunch/patientif the app needs patient context), a PKCEcode_challenge,redirect_uri, andaud(the FHIR server URL).
- Next, the authorization server authenticates the user. Unlike EHR Launch, there is no existing session. The user logs in with their EHR credentials (or their patient portal credentials for patient-facing apps).
- If the app requested
launch/patient, the authorization server presents a patient picker. For clinician apps, this means the clinician selects which patient they want to work with. For patient apps, the patient's own record is automatically selected.
- The server then redirects back to your app with an authorization
code.
- Your app exchanges the code for an access token (same as EHR Launch step 6).
- Your app uses the access token to call the FHIR API.
The critical differences between the two flows:
| Aspect | EHR Launch | Standalone Launch |
|---|---|---|
| Trigger | Clinician clicks in EHR | User opens app directly |
| Context source | EHR provides launch token | App provides aud parameter |
| Authentication | User already authenticated in EHR | User must log in |
| Patient selection | EHR provides patient context | Patient picker or auto-selected |
| Scope for context | launch | launch/patient |
| Required registration | Launch URL registered in EHR | Redirect URI registered in EHR |
| Typical use case | CDS, embedded tools, viewers | Patient portals, analytics, mobile |
Most production apps support both flows. Your app detects the flow by checking whether a launch parameter is present in the incoming request. If it is, you are in an EHR Launch. If not, Standalone.
The Complete OAuth2 + PKCE Flow
Let us trace the entire authorization flow from the moment your app needs a token to the moment it makes its first FHIR API call. We will use the Standalone Launch as our example because it includes every step (EHR Launch is a subset with the launch parameter replacing the aud and patient picker).
Step 1: Discovery
Your app fetches the SMART configuration document from the FHIR server. Discovery is a GET request to /.well-known/smart-configuration:
GET https://fhir.example.com/.well-known/smart-configuration
The response is a JSON document describing the server's authorization capabilities:
{
  "issuer": "https://fhir.example.com",
  "authorization_endpoint": "https://auth.example.com/authorize",
  "token_endpoint": "https://auth.example.com/token",
  "token_endpoint_auth_methods_supported": [
    "client_secret_basic",
    "client_secret_post",
    "private_key_jwt"
  ],
  "registration_endpoint": "https://auth.example.com/register",
  "scopes_supported": [
    "openid",
    "fhirUser",
    "launch",
    "launch/patient",
    "patient/*.read",
    "patient/*.write",
    "user/*.read",
    "user/*.write",
    "offline_access"
  ],
  "response_types_supported": ["code"],
  "capabilities": [
    "launch-ehr",
    "launch-standalone",
    "client-public",
    "client-confidential-symmetric",
    "client-confidential-asymmetric",
    "context-ehr-patient",
    "context-ehr-encounter",
    "context-standalone-patient",
    "sso-openid-connect",
    "permission-patient",
    "permission-user",
    "permission-offline"
  ],
  "code_challenge_methods_supported": ["S256"],
  "introspection_endpoint": "https://auth.example.com/introspect",
  "revocation_endpoint": "https://auth.example.com/revoke"
}
Your app parses this response to extract the authorization_endpoint and token_endpoint. The capabilities array tells you which launch modes the server supports and whether PKCE is required (it should always be, per SMART App Launch v2.0+).
There is an alternative discovery mechanism: the FHIR server's CapabilityStatement (at /metadata) contains a security section with the same URLs. The .well-known/smart-configuration endpoint is preferred because it is simpler, faster to parse, and contains SMART-specific metadata that the CapabilityStatement does not.
Step 2: PKCE Setup
Before redirecting to the authorization endpoint, your app generates a PKCE code verifier and code challenge. PKCE (Proof Key for Code Exchange) prevents authorization code interception attacks and is mandatory in SMART App Launch v2.0+.
// Generate a cryptographically random code_verifier (43-128 characters)
function generateCodeVerifier() {
  const array = new Uint8Array(32);
  crypto.getRandomValues(array);
  return base64URLEncode(array);
}

// Derive code_challenge from code_verifier using SHA-256
async function generateCodeChallenge(verifier) {
  const encoder = new TextEncoder();
  const data = encoder.encode(verifier);
  const digest = await crypto.subtle.digest('SHA-256', data);
  return base64URLEncode(new Uint8Array(digest));
}

function base64URLEncode(buffer) {
  return btoa(String.fromCharCode(...buffer))
    .replace(/\+/g, '-')
    .replace(/\//g, '_')
    .replace(/=+$/, '');
}
Store the code_verifier in session storage. You will need it in Step 5 when exchanging the authorization code for a token.
Step 3: Authorization Request
Redirect the browser to the authorization endpoint with these parameters:
GET https://auth.example.com/authorize?
  response_type=code
  &client_id=my-smart-app
  &redirect_uri=https://myapp.example.com/callback
  &scope=launch/patient patient/Patient.read patient/Observation.read openid fhirUser offline_access
  &state=abc123xyz
  &aud=https://fhir.example.com
  &code_challenge=E9Melhoa2OwvFrEMTJguCHaoeK1t8URWbuGJSstw-cM
  &code_challenge_method=S256
Key parameters:
response_type=code-- Alwayscode. SMART on FHIR uses the authorization code flow exclusively.client_id-- Your app's registered client identifier.redirect_uri-- Must exactly match the redirect URI registered with the authorization server.scope-- Space-separated list of requested SMART scopes (detailed in the next section).state-- A random value for CSRF protection. Verify it matches when the callback arrives.aud-- The FHIR server base URL. Required for Standalone Launch; tells the authorization server which FHIR server your app wants to access.code_challengeandcode_challenge_method-- The PKCE challenge. Always useS256.
Step 4: User Authentication and Authorization
The authorization server handles user authentication (login), patient selection (if launch/patient scope was requested), and scope consent. Your app does not control this step -- the EHR's authorization server renders its own UI.
After the user authenticates and consents, the authorization server redirects back to your redirect_uri:
GET https://myapp.example.com/callback?
  code=eyJ0eXAiOiJKV1QiLCJhbGciOiJSUzI1NiJ9...
  &state=abc123xyz
Step 5: Token Exchange
Your app exchanges the authorization code for an access token by POSTing to the token endpoint. For a public client (no client secret), the request looks like this:
POST https://auth.example.com/token
Content-Type: application/x-www-form-urlencoded

grant_type=authorization_code
&code=eyJ0eXAiOiJKV1QiLCJhbGciOiJSUzI1NiJ9...
&redirect_uri=https://myapp.example.com/callback
&client_id=my-smart-app
&code_verifier=dBjftJeZ4CVP-mB92K27uhbUJU1p1r_wW1gFWFOEjXk
For a confidential client, include the client_secret in the request body or use HTTP Basic authentication with the client credentials in the Authorization header.
The token response contains everything your app needs:
{
  "access_token": "eyJ0eXAiOiJhdCtqd3QiLCJhbGciOiJSUzI1NiJ9.eyJpc3MiOiJodHRwczovL2F1dGguZXhhbXBsZS5jb20iLCJzdWIiOiJwcmFjdGl0aW9uZXItMTIzIiwiYXVkIjoiaHR0cHM6Ly9maGlyLmV4YW1wbGUuY29tIiwiZXhwIjoxNzEyNzUxMjAwLCJzY29wZSI6InBhdGllbnQvUGF0aWVudC5yZWFkIHBhdGllbnQvT2JzZXJ2YXRpb24ucmVhZCBvcGVuaWQgZmhpclVzZXIifQ.signature",
  "token_type": "Bearer",
  "expires_in": 3600,
  "scope": "patient/Patient.read patient/Observation.read openid fhirUser launch/patient",
  "patient": "patient-john-smith",
  "encounter": "encounter-2026-04-01",
  "id_token": "eyJ0eXAiOiJKV1QiLCJhbGciOiJSUzI1NiJ9.eyJpc3MiOiJodHRwczovL2F1dGguZXhhbXBsZS5jb20iLCJzdWIiOiJwcmFjdGl0aW9uZXItMTIzIiwiYXVkIjoibXktc21hcnQtYXBwIiwiZXhwIjoxNzEyNzUxMjAwLCJmaGlyVXNlciI6IlByYWN0aXRpb25lci9wcmFjdGl0aW9uZXItMTIzIn0.signature",
  "refresh_token": "v1.MjAyNi0wNC0wMlQxMjowMDowMFo.dGhpcyBpcyBhIHJlZnJlc2ggdG9rZW4",
  "need_patient_banner": true,
  "smart_style_url": "https://fhir.example.com/smart-style.json"
}
Critical fields in this response:
patient-- The FHIR Patient resource ID. This is the patient the user selected or that was in context during the EHR Launch. All your FHIR API calls should be scoped to this patient.encounter-- The FHIR Encounter resource ID, if the EHR provided encounter context.id_token-- A JWT containing the authenticated user's identity. Decode it to get thefhirUserclaim, which is a FHIR resource reference likePractitioner/practitioner-123.scope-- The scopes the authorization server actually granted. This may be a subset of what you requested -- always check.refresh_token-- Only present if you requested theoffline_accessscope. Use it to get new access tokens without re-authenticating.need_patient_banner-- A boolean indicating whether your app should display a patient banner (name, DOB, MRN) to help the clinician confirm they are looking at the right patient.
Step 6: FHIR API Access
With the access token, your app can now call the FHIR API. Include the token in the Authorization header:
GET https://fhir.example.com/Patient/patient-john-smith
Authorization: Bearer eyJ0eXAiOiJhdCtqd3QiLCJhbGciOiJSUzI1NiJ9...
Accept: application/fhir+json
The FHIR server validates the token, checks that the requested resource falls within the granted scopes, and returns the resource:
{
  "resourceType": "Patient",
  "id": "patient-john-smith",
  "meta": {
    "versionId": "3",
    "lastUpdated": "2026-03-15T10:30:00Z"
  },
  "identifier": [
    {
      "system": "http://hospital.example.com/mrn",
      "value": "MRN-78234"
    }
  ],
  "name": [
    {
      "use": "official",
      "family": "Smith",
      "given": ["John", "Michael"]
    }
  ],
  "birthDate": "1985-07-15",
  "gender": "male"
}
If you try to access a resource outside your granted scopes -- say, requesting MedicationRequest when your token only includes patient/Patient.read and patient/Observation.read -- the FHIR server returns a 403 Forbidden with an OperationOutcome explaining the scope violation.
SMART Scopes Deep-Dive
The SMART scope system is the most misunderstood part of the specification. Developers coming from consumer OAuth2 expect scopes like read, write, admin. SMART scopes encode three dimensions of access control in a single string: who is accessing (context), what resource type, and what operations.
Scope Syntax
The SMART v2 scope syntax follows this pattern:
<context>/<resourceType>.<accessLevel>[?param=value]
Where:
contextispatient,user, orsystemresourceTypeis a FHIR resource name (e.g.,Patient,Observation) or*for all resourcesaccessLevelisread,write, or*(both read and write)
SMART v2 also introduced fine-grained scopes with search parameter filtering. For example, patient/Observation.read?category=vital-signs restricts access to only vital sign observations.
Context Prefixes
The context prefix is where most confusion arises. It does not indicate the type of user. It indicates the access boundary:
| Prefix | Meaning | Access Boundary | Typical Use |
|---|---|---|---|
patient/ | Patient-level access | Only data belonging to the patient in context (from the patient field in the token response) | Patient-facing apps, EHR-embedded apps viewing one patient |
user/ | User-level access | All data the authenticated user is authorized to see in the EHR (may span multiple patients) | Clinician dashboards, population health tools, admin apps |
system/ | System-level access | Backend service access with no user context. Uses client credentials grant (not authorization code). | Bulk data export, ETL pipelines, integration engines |
A clinician using a chart review app would typically have patient/ scopes -- even though they are a clinician, the app only needs data for the one patient they are viewing. A clinician using a panel management dashboard that shows all their patients would use user/ scopes.
Complete Scope Reference
| Scope | Description | Example Use |
|---|---|---|
patient/Patient.read | Read the Patient resource for the patient in context | Display patient demographics |
patient/Observation.read | Read Observations (labs, vitals) for the patient in context | Show lab results, vital signs |
patient/Condition.read | Read Conditions (diagnoses) for the patient in context | Show problem list |
patient/MedicationRequest.read | Read medication orders for the patient in context | Show medication list |
patient/AllergyIntolerance.read | Read allergies for the patient in context | Allergy checking, CDS alerts |
patient/Procedure.read | Read procedures for the patient in context | Surgical history review |
patient/*.read | Read all resource types for the patient in context | Comprehensive patient viewer |
patient/*.write | Write all resource types for the patient in context | Documentation apps, order entry |
user/Patient.read | Read any Patient the user has access to | Patient search, panel management |
user/*.read | Read all resources the user has access to | Research queries, data export |
system/*.read | The backend service reads all accessible data | Bulk FHIR export, analytics ETL |
launch | Request EHR launch context | EHR Launch flow |
launch/patient | Request patient selection context | Standalone Launch with patient picker |
launch/encounter | Request encounter context | Apps that need the current encounter ID |
openid | Request OpenID Connect identity token | Know who the logged-in user is |
fhirUser | Include FHIR user reference in id_token | Map user to Practitioner/Patient resource |
offline_access | Request a refresh token for long-lived access | Background sync, long-running sessions |
The Scope Negotiation Problem
Your app requests scopes, but the authorization server decides which scopes to actually grant. The granted scopes in the token response may be a strict subset of what you requested. This happens for several reasons:
- The EHR admin has restricted the app's allowed scopes during registration.
- The patient or clinician declined certain scope permissions at the consent screen.
- The EHR does not support certain FHIR resource types at all.
Always check the scope field in the token response and gracefully degrade if critical scopes are missing. Never assume you got everything you asked for.
App Registration and Discovery
Before your SMART app can authorize with any EHR, it must be registered. The registration process varies dramatically across EHR vendors, and this is one of the most frustrating aspects of multi-EHR deployment.
The .well-known/smart-configuration Endpoint
Every SMART-compliant FHIR server must expose a /.well-known/smart-configuration endpoint. This is defined in the SMART App Launch IG and is the standardized way for apps to discover authorization endpoints without hardcoding URLs.
The endpoint returns a JSON document that your app parses to extract:
authorization_endpoint-- Where to redirect the user for login and consent.token_endpoint-- Where to exchange authorization codes for tokens.scopes_supported-- Which scopes the server recognizes.capabilities-- Which SMART features the server supports (EHR Launch, Standalone Launch, public clients, PKCE, etc.).code_challenge_methods_supported-- Which PKCE methods are supported (S256should always be here).
CapabilityStatement Security Section
The FHIR CapabilityStatement resource (returned by GET /metadata) also contains authorization information in its rest.security section. That is the older discovery mechanism. The relevant extension URLs are:
{
  "rest": [{
    "security": {
      "extension": [{
        "url": "http://fhir-registry.smarthealthit.org/StructureDefinition/oauth-uris",
        "extension": [
          {
            "url": "authorize",
            "valueUri": "https://auth.example.com/authorize"
          },
          {
            "url": "token",
            "valueUri": "https://auth.example.com/token"
          },
          {
            "url": "register",
            "valueUri": "https://auth.example.com/register"
          }
        ]
      }],
      "service": [{
        "coding": [{
          "system": "http://terminology.hl7.org/CodeSystem/restful-security-service",
          "code": "SMART-on-FHIR"
        }]
      }]
    }
  }]
}
In practice, use .well-known/smart-configuration as your primary discovery mechanism. Fall back to the CapabilityStatement only if the .well-known endpoint is unavailable (some older FHIR servers may not support it). For a deeper understanding of how interoperability standards define these discovery patterns across FHIR, HL7 v2, and C-CDA, see our standards overview.
Vendor Registration Processes
The registration experience is where the "standard" starts to feel less standard. Each major EHR vendor has its own developer portal, its own review process, and its own timeline:
| Vendor | Developer Portal | Registration Process | Review Timeline | Sandbox Access |
|---|---|---|---|---|
| Epic | fhir.epic.com | Self-service app creation. Requires Epic App Orchard listing for production. Each health system must individually approve your app. | 2-8 weeks per health system | Open sandbox, no approval needed |
| Oracle Health (Cerner) | code.cerner.com | Register app on CODE Console. Submit for Cerner App Gallery listing. Per-site activation required. | 4-12 weeks for gallery review | Open sandbox with test patients |
| athenahealth | developer.athenahealth.com | Register on developer portal. Marketplace listing requires business review. API key + OAuth2 credentials. | 2-6 weeks for marketplace | Sandbox with API key |
For production deployments across multiple EHRs, the registration overhead is significant. Building a SMART app is a few days of engineering. Getting it approved and deployed across three EHR vendors can take three to six months. We cover the full multi-vendor deployment strategy in our multi-EHR FHIR facade guide.
Building a SMART App: Code Walkthrough
Let us build a working SMART on FHIR app using fhirclient.js, the official JavaScript client library maintained by the SMART Health IT project. It is the library most SMART apps in production use. It handles discovery, PKCE, token management, and FHIR API calls, so you can focus on your app's clinical logic.
Project Setup
mkdir smart-patient-viewer && cd smart-patient-viewer
npm init -y
npm install fhirclient
Launch Page (index.html)
This page initiates the SMART authorization flow. For a Standalone Launch, you specify the FHIR server URL and scopes directly. For an EHR Launch, the library reads the iss and launch parameters from the URL automatically.
// index.js — Launch entry point
FHIR.oauth2.authorize({
  // For Standalone Launch, specify the FHIR server:
  iss: "https://launch.smarthealthit.org/v/r4/sim/eyJoIjoiMSJ9/fhir",

  // For EHR Launch, omit 'iss' — the library reads it from the URL

  clientId: "my-smart-app",
  scope: "launch/patient patient/Patient.read patient/Observation.read patient/Condition.read openid fhirUser",
  redirectUri: "app.html",

  // PKCE is enabled by default in fhirclient.js v2+
  // No additional configuration needed
});
App Page (app.js)
After the authorization flow completes, the browser redirects here. The library handles the token exchange automatically. Your code starts with a fully authenticated FHIR client.
// app.js — Post-authorization application logic
FHIR.oauth2.ready()
  .then(async (client) => {
    // client is authenticated and ready to use

    // 1. Read the patient resource
    const patient = await client.patient.read();
    renderPatientBanner(patient, client);

    // 2. Fetch active conditions
    const conditions = await client.request(
      `Condition?patient=${patient.id}&clinical-status=active&_sort=-onset-date&_count=20`
    );
    renderConditions(conditions);

    // 3. Fetch recent vital signs
    const vitals = await client.request(
      `Observation?patient=${patient.id}&category=vital-signs&_sort=-date&_count=10`
    );
    renderVitals(vitals);
  })
  .catch((err) => {
    document.getElementById("error").style.display = "block";
    document.getElementById("error").textContent =
      "Authorization failed: " + err.message;
  });

function renderPatientBanner(patient, client) {
  const name = patient.name?.[0];
  const displayName = name
    ? `${name.given?.join(" ") || ""} ${name.family || ""}`.trim()
    : "Unknown";

  const banner = document.getElementById("patient-banner");
  const heading = document.createElement("h2");
  heading.textContent = displayName;
  banner.appendChild(heading);

  const details = document.createElement("p");
  details.textContent = `DOB: ${patient.birthDate || "N/A"} | Gender: ${patient.gender || "N/A"} | MRN: ${patient.identifier?.[0]?.value || "N/A"}`;
  banner.appendChild(details);

  const server = document.createElement("p");
  const small = document.createElement("small");
  small.textContent = `FHIR Server: ${client.state.serverUrl}`;
  server.appendChild(small);
  banner.appendChild(server);
}

function renderConditions(bundle) {
  const container = document.getElementById("conditions");
  const entries = bundle.entry || [];

  const heading = document.createElement("h3");
  heading.textContent = "Active Conditions";
  container.appendChild(heading);

  if (entries.length === 0) {
    const msg = document.createElement("p");
    msg.textContent = "No active conditions found.";
    container.appendChild(msg);
    return;
  }

  const table = document.createElement("table");
  const thead = document.createElement("thead");
  const headerRow = document.createElement("tr");
  ["Condition", "Code", "Status", "Onset"].forEach((text) => {
    const th = document.createElement("th");
    th.textContent = text;
    headerRow.appendChild(th);
  });
  thead.appendChild(headerRow);
  table.appendChild(thead);

  const tbody = document.createElement("tbody");
  entries.forEach((e) => {
    const c = e.resource;
    const code = c.code?.coding?.[0];
    const status = c.clinicalStatus?.coding?.[0]?.code || "unknown";
    const onset = c.onsetDateTime || c.onsetPeriod?.start || "N/A";

    const row = document.createElement("tr");
    [code?.display || "Unknown", code?.code || "", status, onset].forEach((val) => {
      const td = document.createElement("td");
      td.textContent = val;
      row.appendChild(td);
    });
    tbody.appendChild(row);
  });
  table.appendChild(tbody);
  container.appendChild(table);
}

function renderVitals(bundle) {
  const container = document.getElementById("vitals");
  const entries = bundle.entry || [];

  const heading = document.createElement("h3");
  heading.textContent = "Recent Vitals";
  container.appendChild(heading);

  if (entries.length === 0) {
    const msg = document.createElement("p");
    msg.textContent = "No vital signs found.";
    container.appendChild(msg);
    return;
  }

  const table = document.createElement("table");
  const thead = document.createElement("thead");
  const headerRow = document.createElement("tr");
  ["Measurement", "Value", "Date"].forEach((text) => {
    const th = document.createElement("th");
    th.textContent = text;
    headerRow.appendChild(th);
  });
  thead.appendChild(headerRow);
  table.appendChild(thead);

  const tbody = document.createElement("tbody");
  entries.forEach((e) => {
    const obs = e.resource;
    const code = obs.code?.coding?.[0];
    let value = "";
    if (obs.valueQuantity) {
      value = `${obs.valueQuantity.value} ${obs.valueQuantity.unit || ""}`;
    } else if (obs.component) {
      value = obs.component
        .map((c) => `${c.code?.coding?.[0]?.display}: ${c.valueQuantity?.value} ${c.valueQuantity?.unit || ""}`)
        .join(" / ");
    }

    const row = document.createElement("tr");
    [code?.display || "Unknown", value, obs.effectiveDateTime || "N/A"].forEach((val) => {
      const td = document.createElement("td");
      td.textContent = val;
      row.appendChild(td);
    });
    tbody.appendChild(row);
  });
  table.appendChild(tbody);
  container.appendChild(table);
}
Testing with the SMART Launcher
The SMART Health IT project provides a public test launcher at launch.smarthealthit.org. This lets you test both EHR Launch and Standalone Launch flows against a sandboxed FHIR R4 server with synthetic patient data.
To test your app:
- Serve your app locally (e.g.,
npx http-server -p 8080). - Go to launch.smarthealthit.org.
- Set the App Launch URL to
http://localhost:8080/index.html. - Select a simulated user and patient.
- Click Launch. The launcher simulates the EHR redirect to your app.
For automated testing with the ONC's official Inferno test suite, your FHIR server needs to pass the SMART App Launch STU2 test group, which verifies 51 individual assertions covering discovery, authorization, token exchange, scope enforcement, and token refresh.
TypeScript/Node.js Backend Alternative
When you are building a server-rendered app or need backend token management, fhirclient also works in Node.js. Here is an Express.js example:
import express from "express";
import smart from "fhirclient";

const app = express();

// Initiate the SMART launch
app.get("/launch", (req, res) => {
  smart(req, res).authorize({
    clientId: "my-smart-app",
    scope: "launch/patient patient/Patient.read patient/Observation.read openid fhirUser offline_access",
    redirectUri: "/callback",
  });
});

// Handle the OAuth callback
app.get("/callback", async (req, res) => {
  try {
    const client = await smart(req, res).ready();

    // Read the patient
    const patient = await client.patient.read();

    // Fetch recent labs
    const labs = await client.request(
      `Observation?patient=${patient.id}&category=laboratory&_sort=-date&_count=10`
    );

    // Store the client state in session for subsequent requests
    req.session.smartState = client.state;

    res.json({
      patient: {
        id: patient.id,
        name: `${patient.name?.[0]?.given?.join(" ")} ${patient.name?.[0]?.family}`,
        birthDate: patient.birthDate,
      },
      labCount: labs.entry?.length || 0,
    });
  } catch (err) {
    res.status(401).json({ error: err.message });
  }
});

// Subsequent API calls using stored session
app.get("/api/vitals", async (req, res) => {
  try {
    const client = await smart(req, res).ready();
    const vitals = await client.request(
      `Observation?patient=${client.patient.id}&category=vital-signs&_sort=-date&_count=20`
    );
    res.json(vitals);
  } catch (err) {
    res.status(401).json({ error: err.message });
  }
});

app.listen(3000, () => console.log("SMART app listening on port 3000"));
For .NET developers building SMART-enabled APIs, we have a complete code walkthrough in our .NET FHIR integration guide that covers SMART authentication with the Firely SDK.
Multi-EHR Deployment
Building a SMART app that works against one EHR's sandbox is straightforward. Deploying that same app across Epic, Oracle Health, and athenahealth in production is where the real engineering challenges begin. The SMART on FHIR specification is a standard, but each vendor implements it with vendor-specific behaviors, limitations, and quirks that the specification does not address.
Vendor-Specific Quirks
| Behavior | Epic | Oracle Health (Cerner) | athenahealth |
|---|---|---|---|
| FHIR version | R4 (USCDI v1 and v3) | R4 | R4 (partial) |
| Discovery endpoint | /.well-known/smart-configuration and /metadata | /.well-known/smart-configuration and /metadata | /metadata (smart-configuration may be missing on older instances) |
| PKCE requirement | Required for public apps since 2022 | Required for all apps since 2023 | Supported, not always required |
| Scope format | SMART v2 (patient/Patient.read). Some older endpoints require SMART v1 format with resource type in PascalCase only. | SMART v2 supported. Some legacy endpoints use SMART v1 with lowercase (patient/patient.read). | SMART v1 style. Limited v2 support. |
| Wildcard scopes | patient/*.read supported but may be downscoped to specific resources | patient/*.read supported | Wildcard scopes often not supported; enumerate specific resources |
| Token lifetime | Access token: 5 minutes (very short). Refresh token: up to 90 days. | Access token: 10-15 minutes. Refresh token: varies by site configuration. | Access token: 60 minutes. Refresh token: 24 hours. |
| Refresh token | Requires offline_access scope. Single-use (rotated on each refresh). | Requires offline_access scope. Reusable within the refresh window. | Automatic with OAuth2 flow. No explicit scope needed. |
| Backend services (system scope) | Supported via SMART Backend Services with JWT client assertion (private_key_jwt). Requires separate registration. | Supported via client_credentials grant with system account. Separate registration path. | Limited support. Contact developer relations for backend service access. |
| Patient search | Supports Patient?identifier=, Patient?name=, Patient?birthdate=. No Patient?_id= search. | Supports standard search parameters. Patient?_id= works. | Supports basic search. Limited chained search parameters. |
| USCDI support | USCDI v1 (May 2022 update), USCDI v3 (Feb 2024 update), USCDI v4 (roadmap) | USCDI v1, v3 in progress | USCDI v1 (partial coverage) |
| App review process | App Orchard listing required. Per-site activation. 2-8 weeks per site. | CODE Console + App Gallery. Global activation possible. 4-12 weeks. | Marketplace listing. API key management. 2-6 weeks. |
Building a Configuration Layer
The practical solution to vendor quirks is a per-vendor configuration layer. Your app stores vendor-specific settings and selects the right configuration based on the FHIR server URL it connects to.
interface EHRConfig {
  vendorId: string;
  fhirBaseUrl: string;
  clientId: string;
  scopes: string[];
  tokenRefreshBuffer: number; // seconds before expiry to trigger refresh
  supportsWildcardScopes: boolean;
  scopeVersion: "v1" | "v2";
  requiresPKCE: boolean;
  customHeaders?: Record<string, string>;
}

const EHR_CONFIGS: Record<string, EHRConfig> = {
  "epic-production": {
    vendorId: "epic",
    fhirBaseUrl: "https://fhir.epic.com/interconnect-fhir-oauth/api/FHIR/R4",
    clientId: "your-epic-client-id",
    scopes: [
      "launch/patient",
      "patient/Patient.read",
      "patient/Observation.read",
      "patient/Condition.read",
      "patient/MedicationRequest.read",
      "patient/AllergyIntolerance.read",
      "openid",
      "fhirUser",
      "offline_access",
    ],
    tokenRefreshBuffer: 60, // Epic tokens expire in 5 min — refresh early
    supportsWildcardScopes: false, // enumerate explicitly for reliability
    scopeVersion: "v2",
    requiresPKCE: true,
  },
  "oracle-health-production": {
    vendorId: "oracle",
    fhirBaseUrl: "https://fhir-open.cerner.com/r4/tenant-id",
    clientId: "your-cerner-client-id",
    scopes: [
      "launch/patient",
      "patient/Patient.read",
      "patient/Observation.read",
      "patient/Condition.read",
      "patient/MedicationRequest.read",
      "patient/AllergyIntolerance.read",
      "openid",
      "fhirUser",
      "offline_access",
    ],
    tokenRefreshBuffer: 120,
    supportsWildcardScopes: true,
    scopeVersion: "v2",
    requiresPKCE: true,
  },
  "athena-production": {
    vendorId: "athena",
    fhirBaseUrl: "https://api.platform.athenahealth.com/fhir/r4",
    clientId: "your-athena-client-id",
    scopes: [
      "launch/patient",
      "patient/Patient.read",
      "patient/Observation.read",
      "patient/Condition.read",
      "patient/MedicationRequest.read",
      "openid",
      "fhirUser",
    ],
    tokenRefreshBuffer: 300,
    supportsWildcardScopes: false,
    scopeVersion: "v1",
    requiresPKCE: true,
  },
};
This pattern scales. When you add a new EHR vendor, you add a configuration entry. Your authorization logic, FHIR API calls, and token refresh logic remain the same. We go deeper on this multi-vendor strategy -- including FHIR facade patterns that normalize vendor differences behind a single API -- in our multi-EHR FHIR facade guide.
Security Best Practices
SMART on FHIR inherits OAuth2's security properties and adds healthcare-specific requirements. Here are the practices that matter in production.
PKCE Is Mandatory, Not Optional
SMART App Launch v2.0+ requires PKCE for all public clients and recommends it for confidential clients. Always use S256 as the challenge method. Never use plain. Building a single-page application or mobile app? Your app is a public client and PKCE is your only defense against authorization code interception.
The fhirclient.js library enables PKCE by default. Should you implement the flow manually, generate the code verifier using a cryptographically secure random number generator, not Math.random().
Token Storage
Where you store tokens determines your security posture:
- Browser-based apps: Store access tokens in memory (a JavaScript variable). Never store tokens in
localStorageorsessionStorage-- these are accessible to any JavaScript running on the same origin, including XSS payloads. If you need to survive page refreshes, use an HTTP-only, Secure, SameSite=Strict cookie to store a session identifier, and keep the token server-side. - Server-rendered apps: Store tokens in server-side sessions (Redis, database, encrypted file system). Associate tokens with the user's session cookie.
- Mobile apps: Use the platform's secure storage (iOS Keychain, Android Keystore). Never store tokens in shared preferences or plain files.
- Backend services: Store client credentials (private keys for JWT assertions) in a secrets manager (AWS Secrets Manager, Azure Key Vault, HashiCorp Vault). Never commit private keys to source control.
Refresh Token Handling
Refresh tokens extend your app's access beyond the initial access token lifetime without requiring the user to re-authenticate. They require careful handling:
- Request refresh tokens only when needed. Only include
offline_accessin your scopes if your app genuinely needs long-lived access (e.g., background data sync, scheduled reports). Patient-facing apps that are only used during a single session do not need refresh tokens.
- Refresh proactively, not reactively. Do not wait for a 401 response to refresh the token. Track the
expires_invalue from the token response and trigger a refresh before expiry. For Epic (5-minute tokens), refresh at the 3-minute mark. For Oracle Health (10-15 minutes), refresh at 8 minutes.
- Handle token rotation. Epic rotates refresh tokens -- each refresh response includes a new refresh token, and the old one is invalidated. Store the new refresh token immediately after each refresh. If you miss one, the user must re-authenticate.
- Implement a token refresh mutex. In single-page apps, multiple components may try to refresh the token simultaneously when they all detect expiry. Use a mutex or singleton promise to ensure only one refresh request is in flight at a time.
class TokenManager {
  private refreshPromise: Promise<TokenResponse> | null = null;
  private currentToken: TokenResponse;
  private ehrConfig: EHRConfig;
  private tokenEndpoint: string;

  async getValidToken(): Promise<string> {
    const token = this.currentToken;

    if (this.isTokenExpiringSoon(token)) {
      // Deduplicate concurrent refresh attempts
      if (!this.refreshPromise) {
        this.refreshPromise = this.refreshToken(token.refresh_token)
          .finally(() => { this.refreshPromise = null; });
      }
      const newToken = await this.refreshPromise;
      this.currentToken = newToken;
      return newToken.access_token;
    }

    return token.access_token;
  }

  private isTokenExpiringSoon(token: TokenResponse): boolean {
    const bufferSeconds = this.ehrConfig.tokenRefreshBuffer;
    const expiresAt = token.issued_at + (token.expires_in * 1000);
    return Date.now() > expiresAt - (bufferSeconds * 1000);
  }

  private async refreshToken(refreshToken: string): Promise<TokenResponse> {
    const response = await fetch(this.tokenEndpoint, {
      method: "POST",
      headers: { "Content-Type": "application/x-www-form-urlencoded" },
      body: new URLSearchParams({
        grant_type: "refresh_token",
        refresh_token: refreshToken,
        client_id: this.ehrConfig.clientId,
      }),
    });

    if (!response.ok) {
      throw new Error(`Token refresh failed: ${response.status}`);
    }

    return response.json();
  }
}
Session Management
SMART on FHIR tokens represent a user's authorized session with your app. Proper session management includes:
- Bind sessions to tokens: Your app's session should be invalidated when the SMART token expires and cannot be refreshed. Do not maintain an app session beyond what the token permits.
- Implement logout: When the user logs out, revoke the access token and refresh token by calling the authorization server's revocation endpoint (if available in the SMART configuration). Clear all stored tokens and session data.
- Respect the
need_patient_bannerflag: If the token response includes"need_patient_banner": true, your app must display the patient's name, date of birth, gender, and photo (if available) so the clinician can verify they are viewing the correct patient. This is a patient safety requirement.
- Handle EHR session expiry: In an EHR Launch, the clinician's EHR session may expire while your app is still open. Your app should handle the resulting 401 errors gracefully and prompt the user to re-launch from the EHR.
For a comprehensive treatment of healthcare API security beyond SMART on FHIR -- including HIPAA technical safeguards, audit logging requirements, and penetration testing checklists -- see our healthcare API security guide.
SMART on FHIR and AI-Powered Clinical Apps
SMART on FHIR is increasingly the authorization layer for AI-powered clinical applications. CDS Hooks (Clinical Decision Support Hooks) use SMART on FHIR tokens to authorize AI services that provide real-time clinical recommendations within the EHR. An AI agent that reads patient data from FHIR APIs to generate a clinical summary, pre-populate a prior authorization form, or suggest a diagnosis differential needs a SMART token to access that data.
The authorization model is the same: the AI agent's backend service obtains a SMART token (either via EHR Launch when triggered by a CDS Hook, or via Backend Services for batch processing), uses the token to read FHIR resources, and returns its output to the clinician. The SMART scopes ensure the AI only accesses the data it needs -- an AI clinical note generator should not have access to billing data, and a population health analytics pipeline should not have access to individual patient notes.
We cover the full architecture of connecting AI agents to EHRs through FHIR, CDS Hooks, and SMART Launch in our AI agent EHR connection guide. For mobile apps that connect to Epic or Oracle Health, our Epic and Oracle integration guide covers the mobile-specific SMART launch considerations, including deep linking and native app redirects.